Quick Start Guide
Table of Contents
Introduction
- In this quick start guide you will learn:
- How to use a docker based RackHD service.
- How to use RackHD API to install OS on a node(the node is a virtual node powered by a bare metal server simulator InfraSIM https://github.com/infrasim)
Install Docker & Docker Compose
| Install Docker CE | https://docs.docker.com/install/#server |
| Install Docker Compose | https://docs.docker.com/compose/install/#install-compose |
Setup RackHD Service
mkdir ~/src && cd ~/src
git clone https://github.com/RackHD/RackHD

cd ~/src/RackHD/example/rackhd
sudo docker-compose up –d

# Check RackHD services are running
sudo docker-compose ps

#  Sample response:
#
#  Name                      Command                                    State                 Ports
#  --------------------------------------------------------------------------------------------------------------
#  rackhd_dhcp-proxy_1     node /RackHD/on-dhcp-proxy ...               Up
#  rackhd_dhcp_1           /docker-entrypoint.sh                        Up
#  rackhd_files_1          /docker-entrypoint.sh                        Up
#  rackhd_http_1           node /RackHD/on-http/index.js                Up
#  rackhd_mongo_1          docker-entrypoint.sh mongod                  Up      27017/tcp, 0.0.0.0:9090->9090/tcp
#  rackhd_rabbitmq_1       docker-entrypoint.sh rabbi ...               Up
#  rackhd_syslog_1         node /RackHD/on-syslog/ind ...               Up
#  rackhd_taskgraph_1      node /RackHD/on-taskgraph/ ...               Up
#  rackhd_tftp_1           node /RackHD/on-tftp/index.js                Up
Setup a Virtualized Infrastructure Environment
cd ~/src/RackHD/example/infrasim
sudo docker-compose up –d

# Sample response
# 7b8944444da7 infrasim_infrasim ... 22/tcp, 80/tcp infrasim_infrasim_1
For example, we choose infrasim_infrasim0_1, use following command to retrieve its IP Address.
sudo docker exec -it infrasim_infrasim_1 ifconfig br0

# Sample response
# br0 Link encap:Ethernet HWaddr 02:42:ac:1f:80:03
#     inet addr:172.31.128.112 Bcast:172.31.143.255 Mask:255.255.240.0
#     UP BROADCAST RUNNING MULTICAST MTU:1500 Metric:1
#     RX packets:2280942 errors:0 dropped:0 overruns:0 frame:0
#     TX packets:2263193 errors:0 dropped:0 overruns:0 carrier:0
#     collisions:0 txqueuelen:0
#     RX bytes:207752197 (207.7 MB) TX bytes:265129274 (265.1 MB)
Note
If br0 is not available, use sudo docker-compose restart to restart the vNodes.
Here 172.31.128.112 is infrasim_infrasim_1’s BMC IP Address.
In order to connect to vNode from “UltraVNC Viewer” vnc_forward script should be executed.
./vnc_forward

# Sample response
# ...
# Setting VNC port 28109 for IP 172.31.128.109
# Setting VNC port 28110 for IP 172.31.128.110
# Setting VNC port 28111 for IP 172.31.128.111
# Setting VNC port 28112 for IP 172.31.128.112
# Setting VNC port 28113 for IP 172.31.128.113
# Setting VNC port 28114 for IP 172.31.128.114
# ...
Get vNode’s node-id
curl localhost:9090/api/current/nodes?type=compute |  jq '.' | grep \"id\"

# Example Response
# "id": "5acf78e3291c0a010002a9a8",
Here 5acf78e3291c0a010002a9a8 is our target node-id
Ensure its OBM setting is not blank
# replace the node-id with your own
curl localhost:9090/api/current/nodes/<node-id>/obm | jq '.'

# Example Response

# [
#   {
#     "config": {
#       "host": "02:42:ac:1f:80:03",
#       "user": "__rackhd__"
#     },
#     "service": "ipmi-obm-service",
#     "node": "/api/2.0/nodes/5acf78e3291c0a010002a9a8",
#     "id": "5acf7973291c0a010002a9d2"
#   }
# ]
If the response comes back [], please follow OBM Setting, to add OBM setting.
Setup OS Mirror
To provision the OS to the node, RackHD can act as an OS mirror repository. Let’s take CentOS installation for example.
cd ~/src/RackHD/example/rackhd/files/mount/common
mkdir –p centos/7/os/x86_64/
sudo mount –o loop ~/iso/CentOS-7-x86_64-DVD-1708.iso centos/7/os/x86_64
CentOS-7-x86_64-DVD-1708.iso can be downloaded from Official site.
/files/mount/common is a volume which is mounted to rackhd/files docker container as a static file service.
After ISO file is mounted, we need to restart file service. (This is a docker’s potential bug which cannot sync files mounted in the volume when container is running)
cd ~/src/RackHD/example/rackhd
sudo docker-compose restart
The OS mirror will be available on http://172.31.128.2:9090/common/centos/7/os/x86_64 from vNode’s perspective.
Install OS with RackHD API
Download CentOS OS installation payload example (more Other OS Examples.)
wget https://raw.githubusercontent.com/RackHD/RackHD/master/example/samples/install_centos_7_payload_minimal.json
Edit downloaded payload json install_centos_7_payload_minimal.json as below, 172.31.128.2 is the OS mirror’s IP address.
# Change the "repo" line to below.
"repo": "http://172.31.128.2:9090/common/centos/7/os/x86_64"
Install CentOS by using build-in InstallCentOS workflow
curl -X POST -H 'Content-Type: application/json' -d @install_centos_7_payload_minimal.json localhost:9090/api/2.0/nodes/<nodeID>/workflows?name=Graph.InstallCentOS | jq .
Monitor Progress
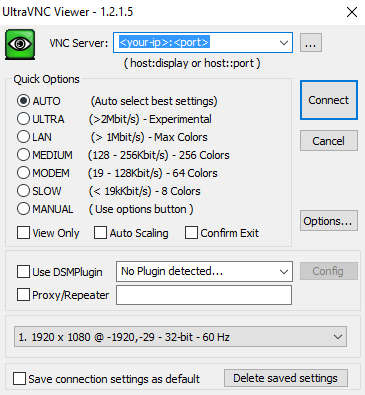
Use UltraVNC on the desktop to view the OS installation, replace <your-ip> with your own, and <port> you retrieved using the vnc_forward script above
After login, you should see CentOS7 is installing
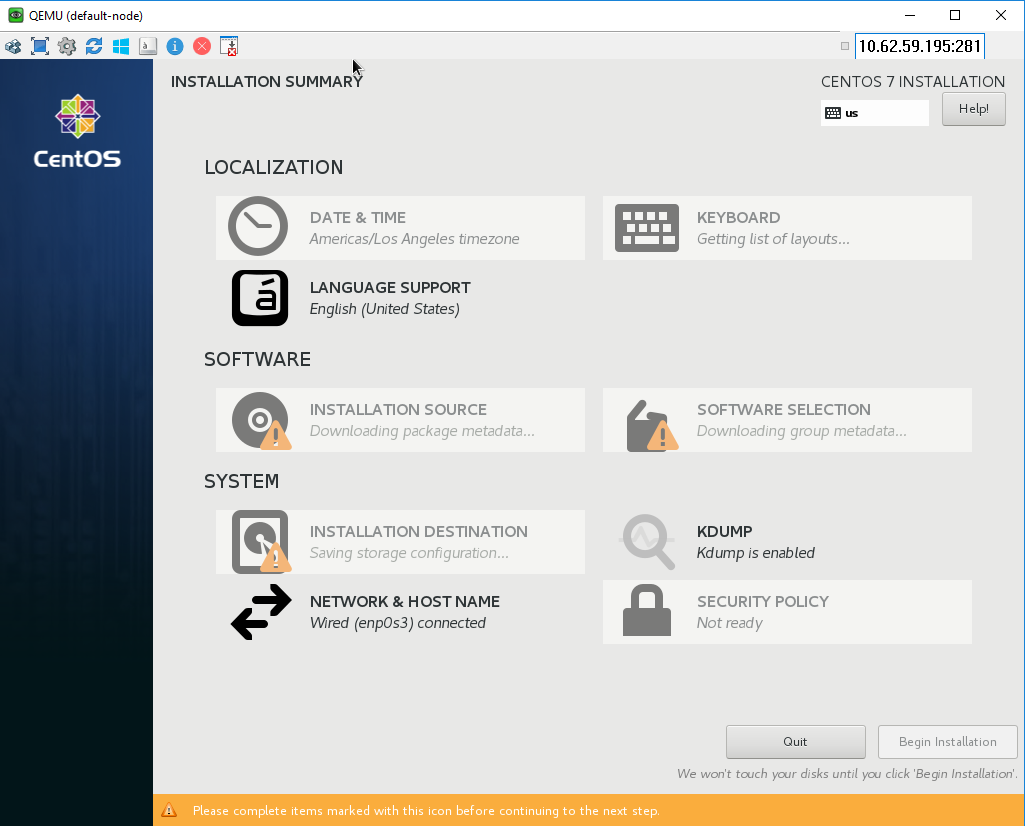
It will PXE boot from the CentOS installation image and progress screen will show up in about 5 mins, the entire installation takes around 9 mins. You can move on the guide or revisit previous sessions, then go back after 4~5 minutes
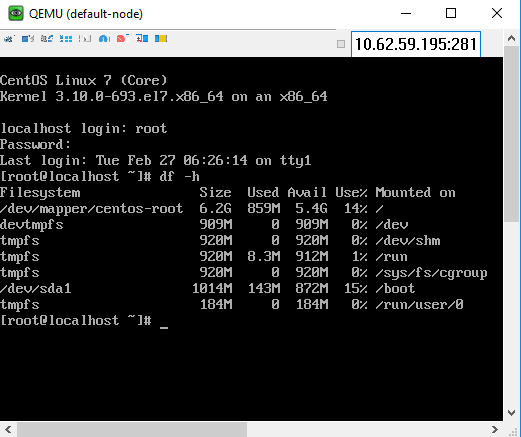
Login Installed OS
Once the OS has been installed, you can try login the system via UltraVNC console.
Installed OS default username/password: root/RackHDRocks!